

Embossing Perfect Poinsettias

Disclosure: Where available I use compensated affiliate links which means if you make a purchase, I receive a small commission at no extra cost to you. Thank you so much for your support!
This post which includes a video shows how I create seven cards using Altenew’s Perfect Poinsettias 3D Embossing Folder. Techniques include those that I learned from Altenew Design Team members, Erum Tasneem (add inking effects to debossed panels) and Jaycee Gaspar (embossing overlay), though I used the overlay technique on a debossed card panel.
Check out video below.
Gallery of Cards Created
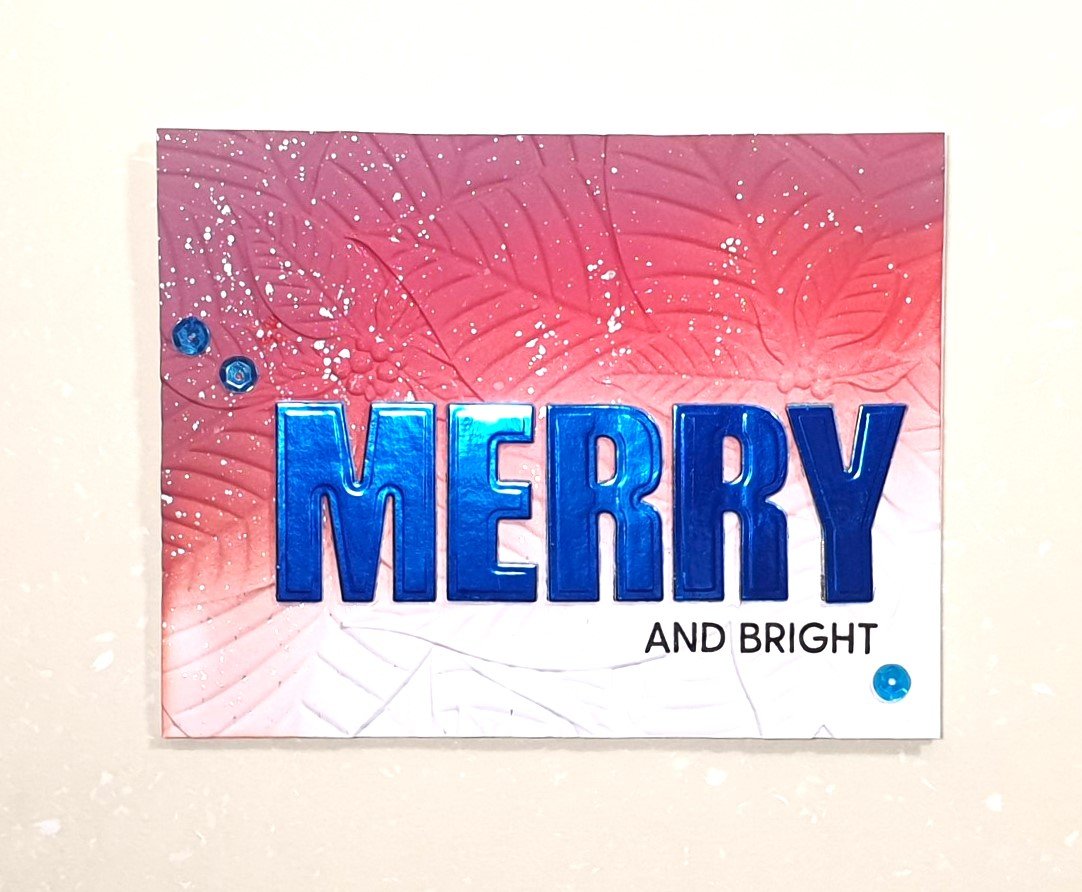
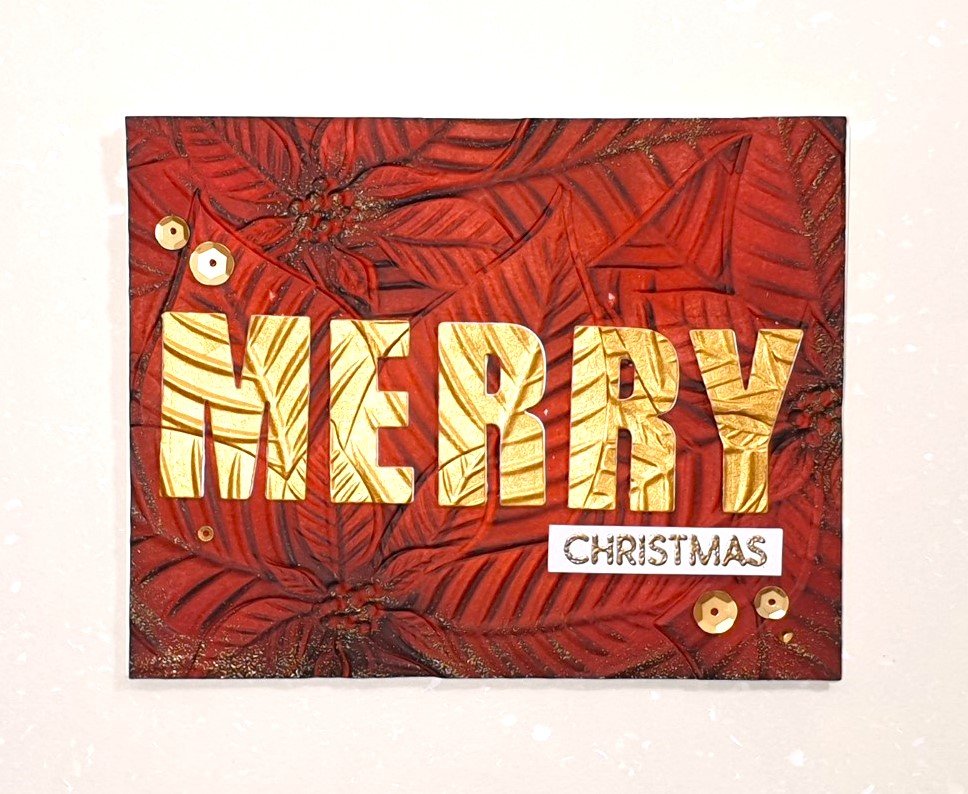
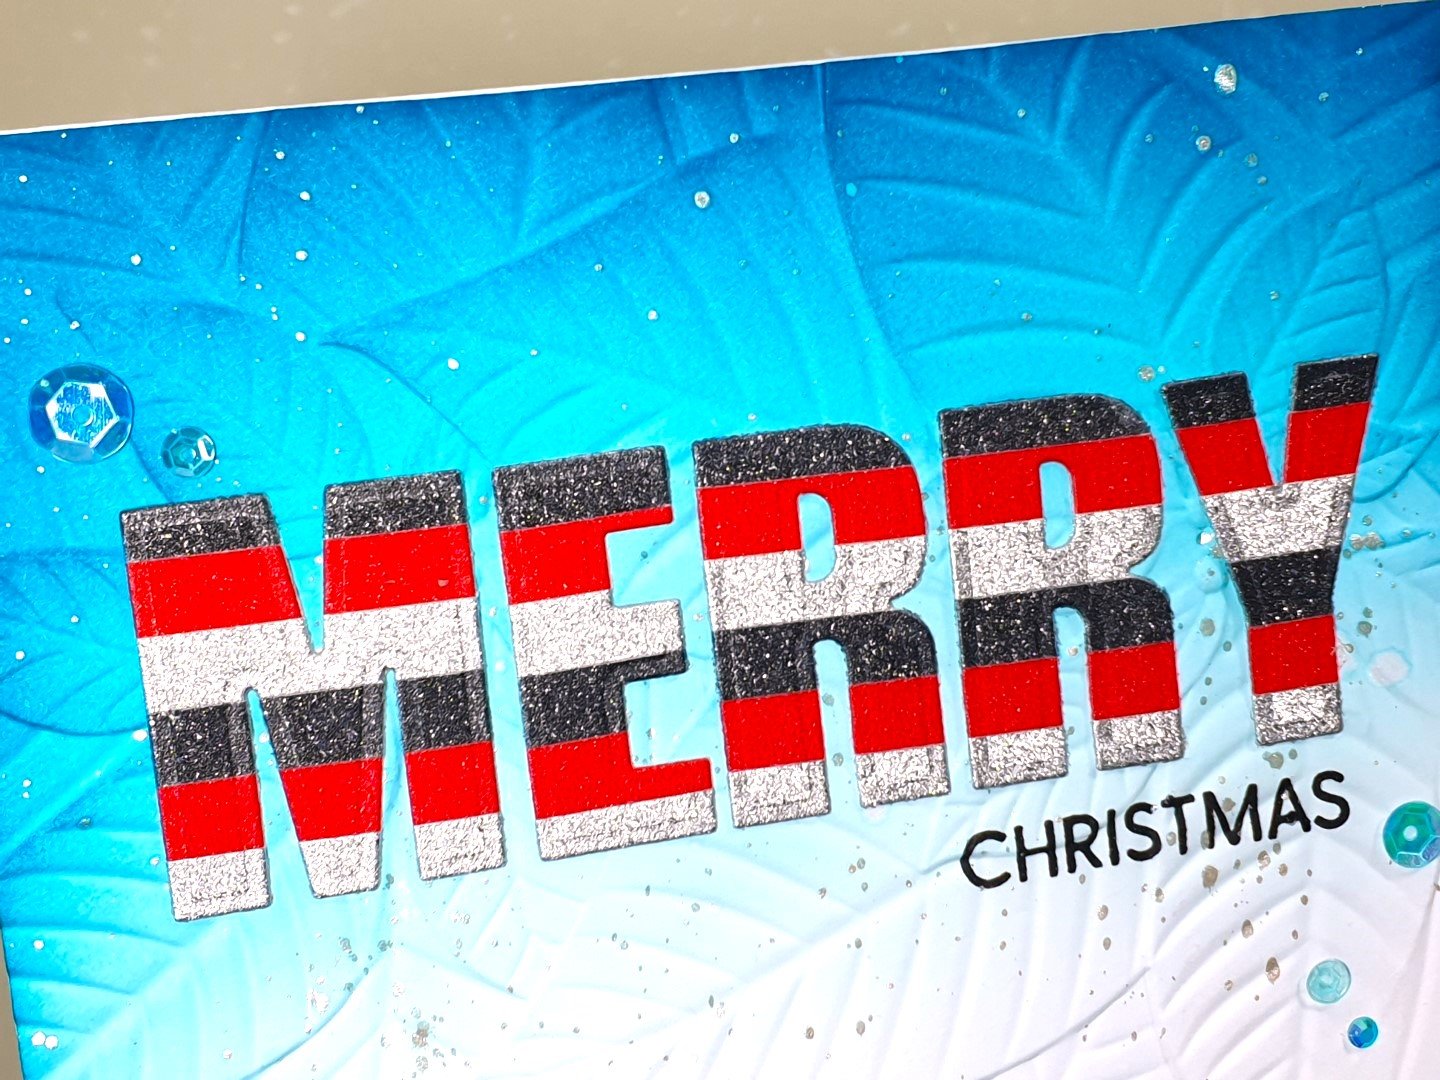

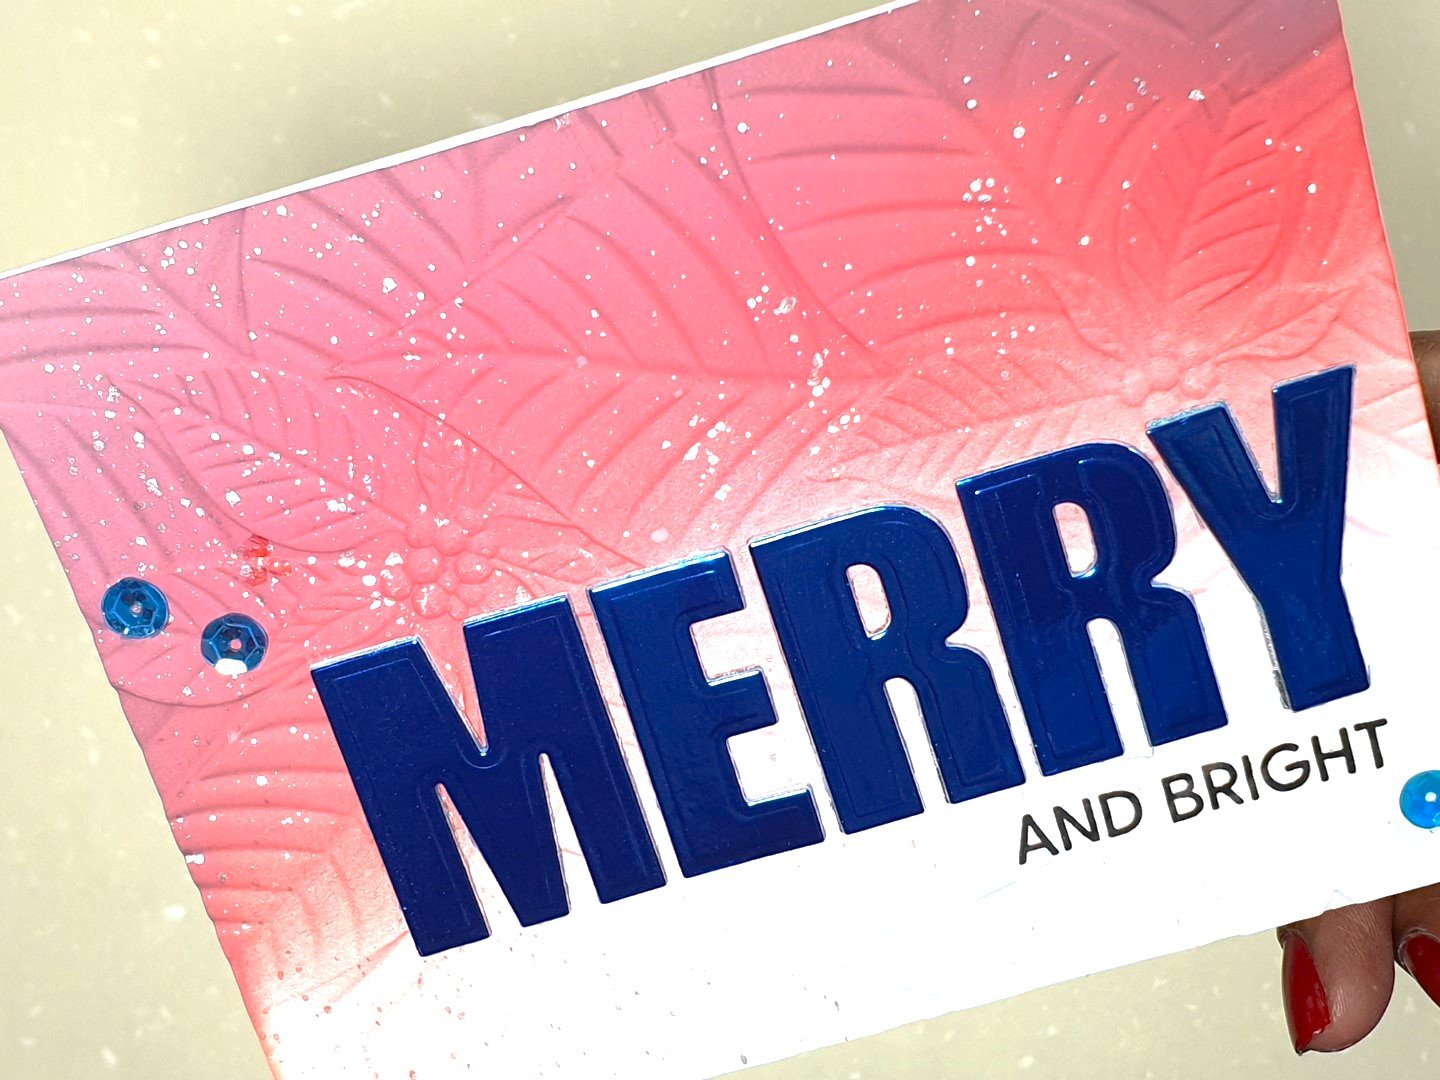
Card #1

Ink blend Distress Oxide Candied Apple, Lumberjack Plaid, and Aged Mahogany on Neenah Solar White 80lb card with and ink blending tool. Die cut ‘Merry’ in satin blue card using Altenew Caps Bold Alphabet Die Set. Arrange ‘Merry’ on card panel in stamping platform to ascertain where to stamp ‘and bright’ (from Waffle Flower Oversized Merry Stamp Set) with Obsidian Pigment Ink.
Spritz back of inked panel with water to soften fibres so the card does not crack when embossed. Insert card panel into Altenew Perfect Poinsettias 3D Embossing Folder, utilise the correct ‘sandwich’ and run through embossing machine.

Splatter Silver Sterling metallic pigment from Altenew Metallic Watercolor set onto card panel, protecting your work surface with a splat box.
Back card panel with fun foam and adhere to front of card base. Finish card with Peacock 6mm sequins from Lucy’s Shop.
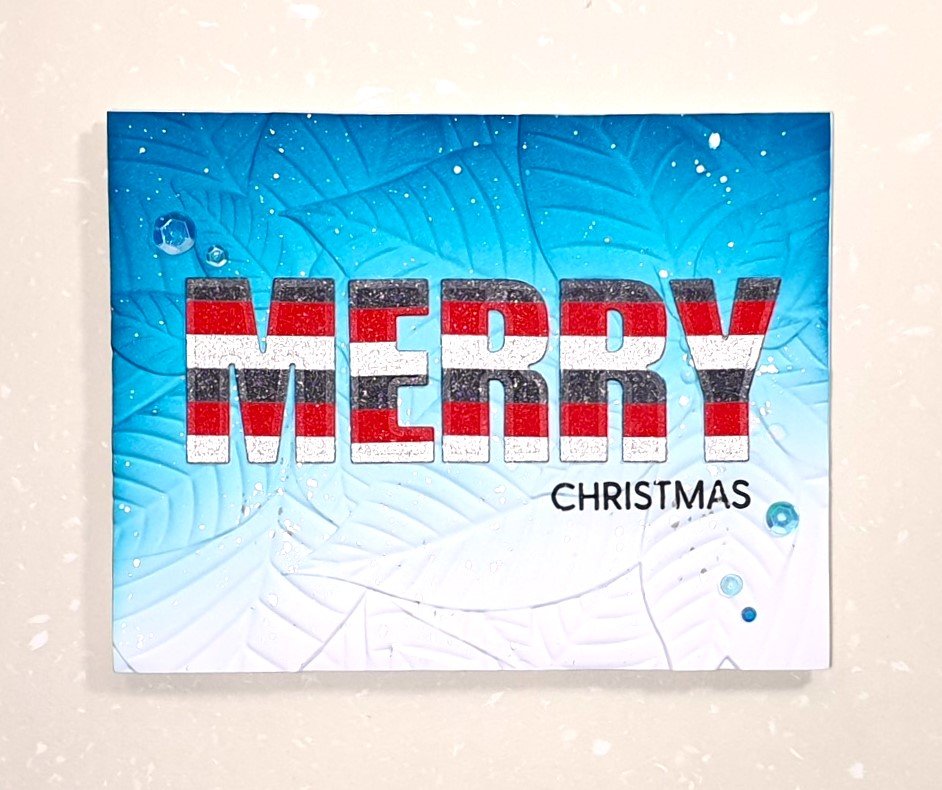
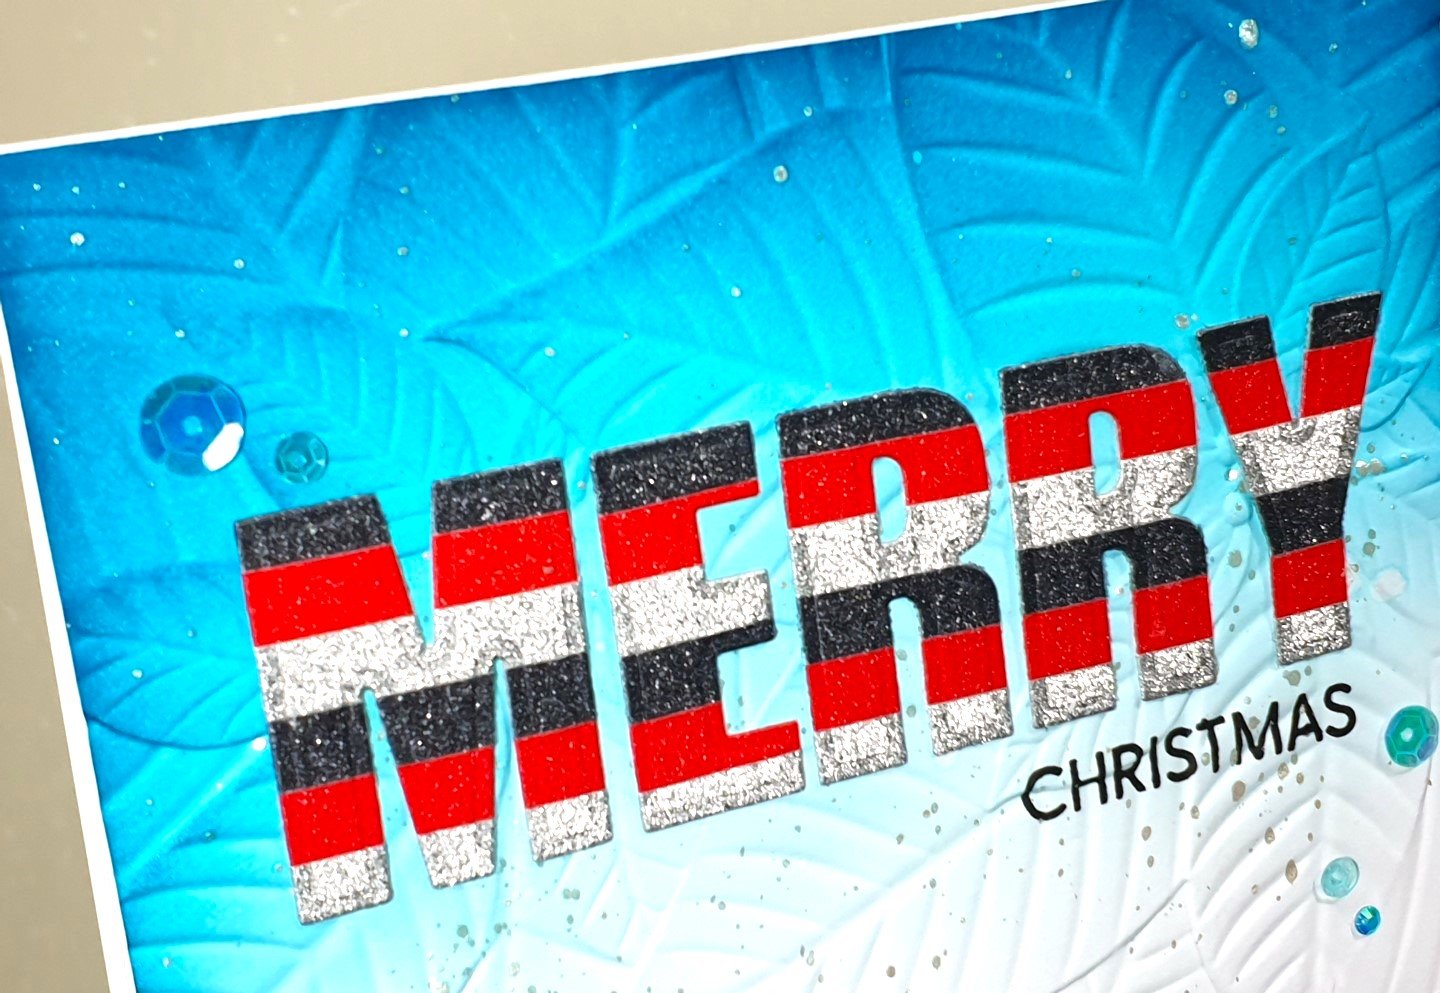
Card #2

Ink blend Altenew Crisp Dye Inks, Aqualicious, Teal Cave, and Galactic Stream on Neenah Solar White 80lb card using a large blending brush.
Cut glitter glitter card (red, black, and silver) into quarter inch width strips and adhere to a thin copy paper. Die cut ‘Merry’ from this glitter strips card using Altenew Caps Bold Alphabet Die Set. Arrange ‘Merry’ on card panel in stamping platform to ascertain where to stamp ‘Christmas’ (from Waffle Flower Oversized Merry Stamp Set) with Obsidian Pigment Ink.
Spritz back of inked panel with water to soften fibres so the card does not crack when embossed. Insert card panel into Altenew Perfect Poinsettias 3D Embossing Folder, utilise the correct ‘sandwich’ and run through embossing machine.

Splatter Silver Sterling metallic pigment from Altenew Metallic Watercolor set onto card panel, protecting your work surface with a splat box.
Back card panel with fun foam and adhere to front of card base. Finish card with Pool sequins from Lucy’s Shop.
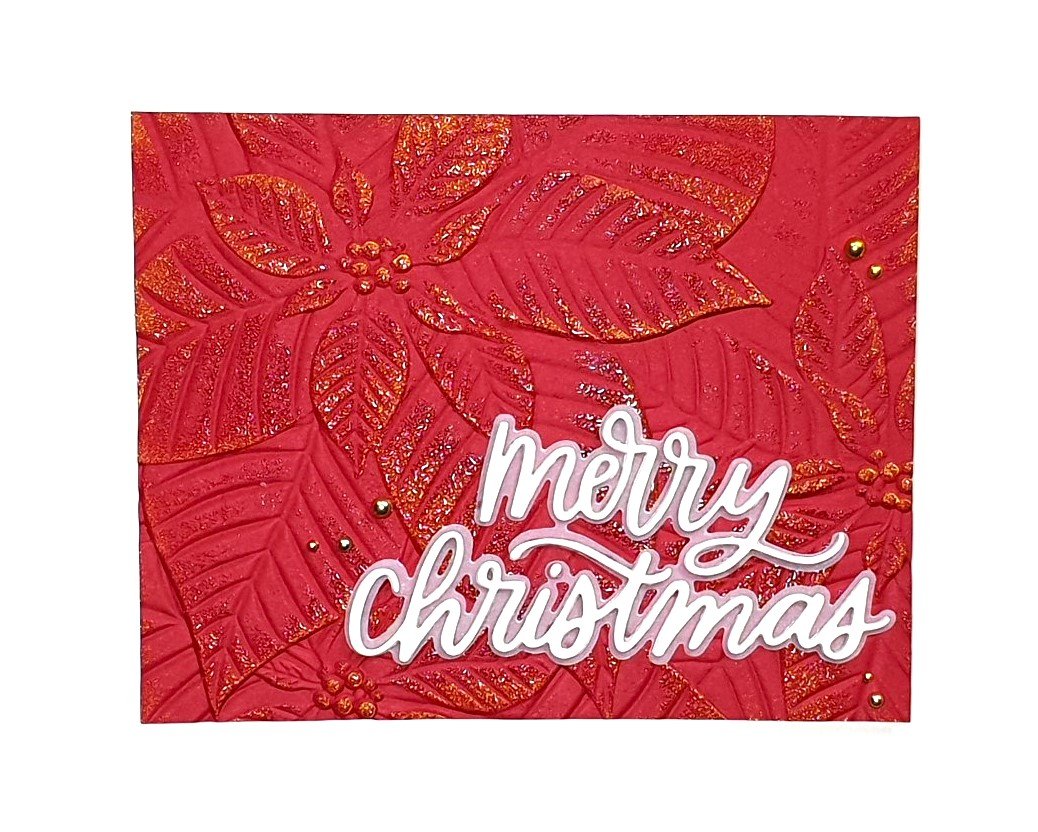
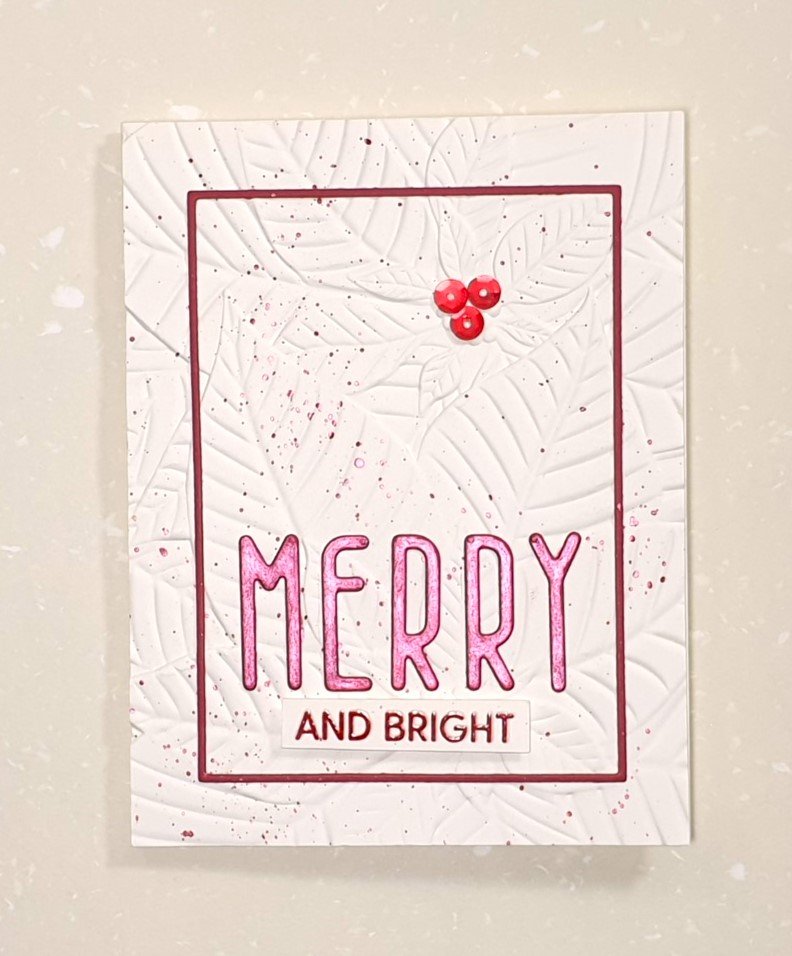
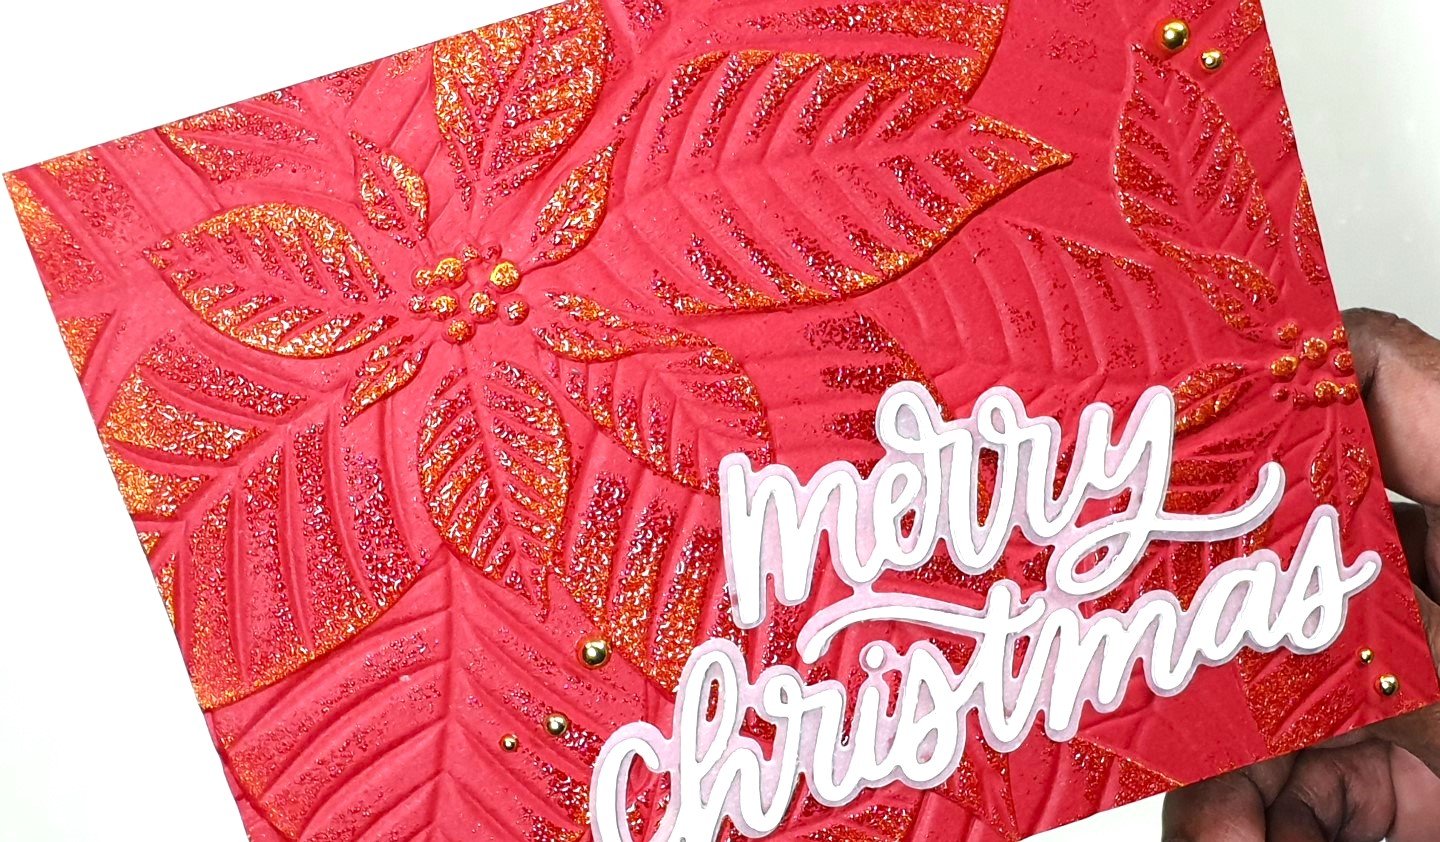
Card #3

Cut an A2 sized card panel from Hero Hues Cranberry cardstock. Spritz back of card panel with water to soften fibres so the card does not crack when embossed. Insert card panel into Altenew Perfect Poinsettias 3D Embossing Folder, utilise the correct ‘sandwich’ and run through embossing machine.

Lightly apply Enchanted Gold Pigment Ink on embossed card panel to ‘catch’ the raised areas. Note: Probably best to apply some anti-static powder on embossed card panel before applying pigment ink as we are going to heat emboss. The light application of the ink will take time and patience is required. Sprinkle Clear Embossing Powder, and melt embossing powder with heat tool.
Back card panel with fun foam and adhere to front of card base. Die cut sentiment with My Favorite Things Merry Christmas die, the shadow of the sentiment is die cut in vellum - and adhere to card front with liquid glue. Finish card with Spellbinders Fashion Gold Embellishments.
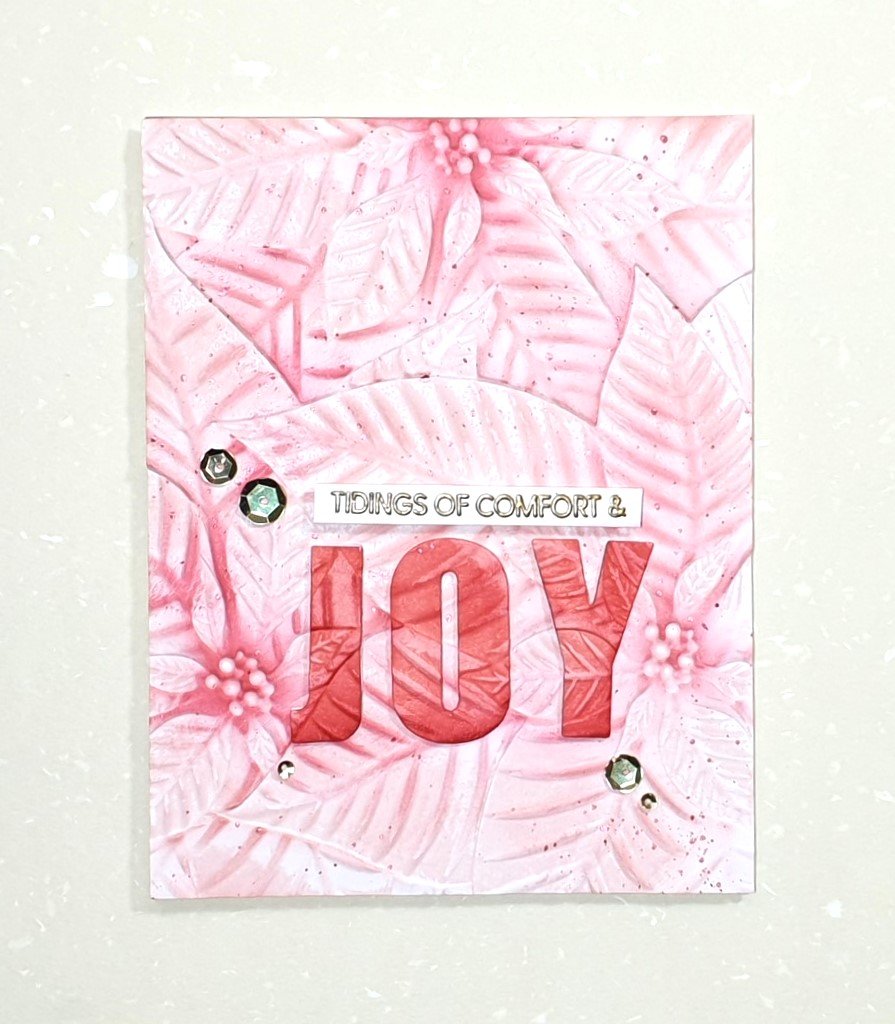
Card #4

Cut Neenah Solar White 80lb card to A2 size, spritz back of card panel with water to soften fibres so the card does not crack when debossed. That’s right the debossed image is used for this card. Place card inside the Altenew Perfect Poinsettias 3D Embossing Folder, and run through embossing machine. Then apply Altenew Crisp Dye Inks Blush, Rouge, and Crimson with large blending brush and small blending brush. Apply inks lightly to ‘catch’ the raised areas.
Die cut the alphabets to spell ‘Joy’ with Altenew Caps Bold Alphabet Die Set. Then place embossed and inked panel back into the embossing folder, try to ‘slot’ it in. Arrange ‘Joy’ on the lower third of the card panel. Place a strip of satin masking tape across the alphabets spelling ‘Joy’ and ensure the the tape reaches the folder edge that will act as a hinge. Lift ‘Joy’ with the tape and remove the embossed card panel, close folder and run through embossing machine.
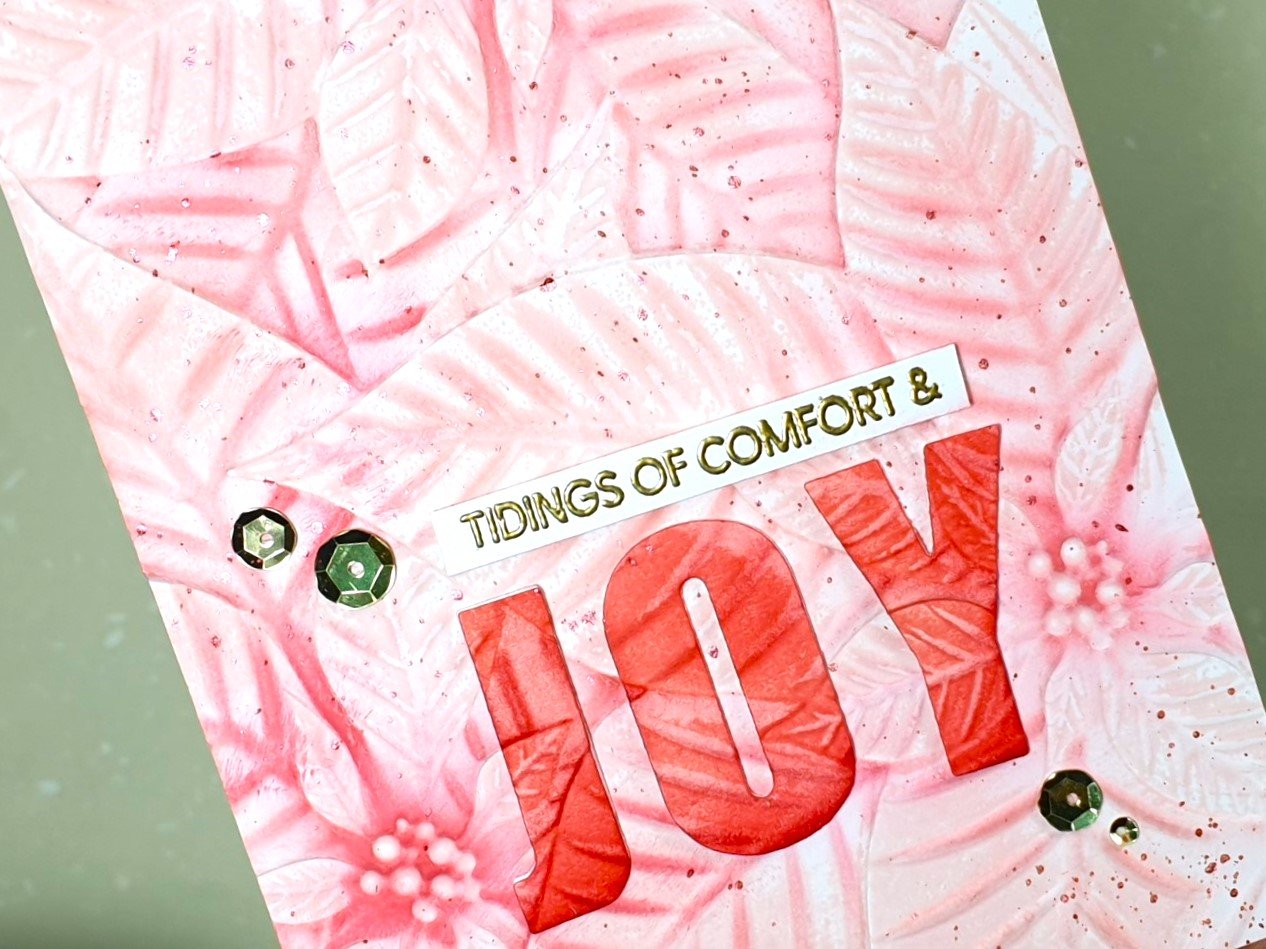
Add Crimson and Velvet ink to debossed ‘Joy’. Splatter debossed card panel with watered down Velvet ink and adhere ‘Joy’ to debossed card panel where the image aligns to the pattern of each alphabet. Stamp ‘tidings of comfort &’ in clear embossing ink from Waffle Flower Oversized Joy Stamp, sprinkle gold embossing powder, and melt embossing powder with heat tool. Cut sub-sentiment to a strip and adhere to card front above the main sentiment ‘Joy’.
Finish card by adhering Satin Gold Sequins to card from with Crystal Katana gem picker tool and liquid glue with a fine tip.
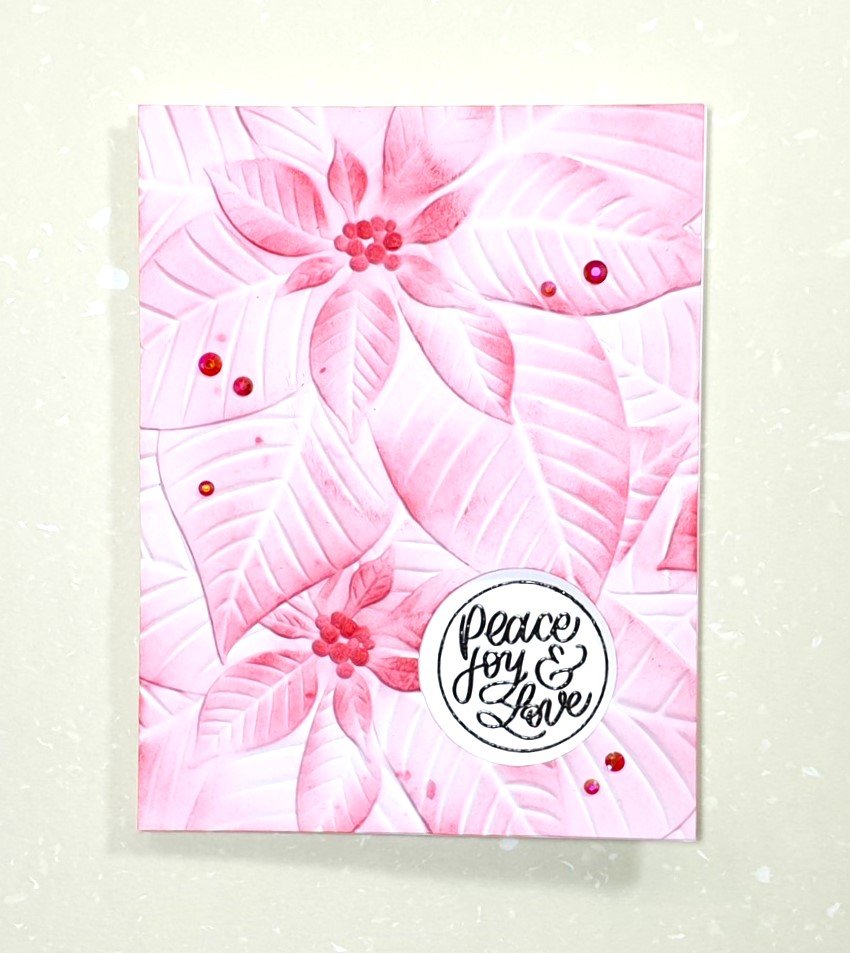
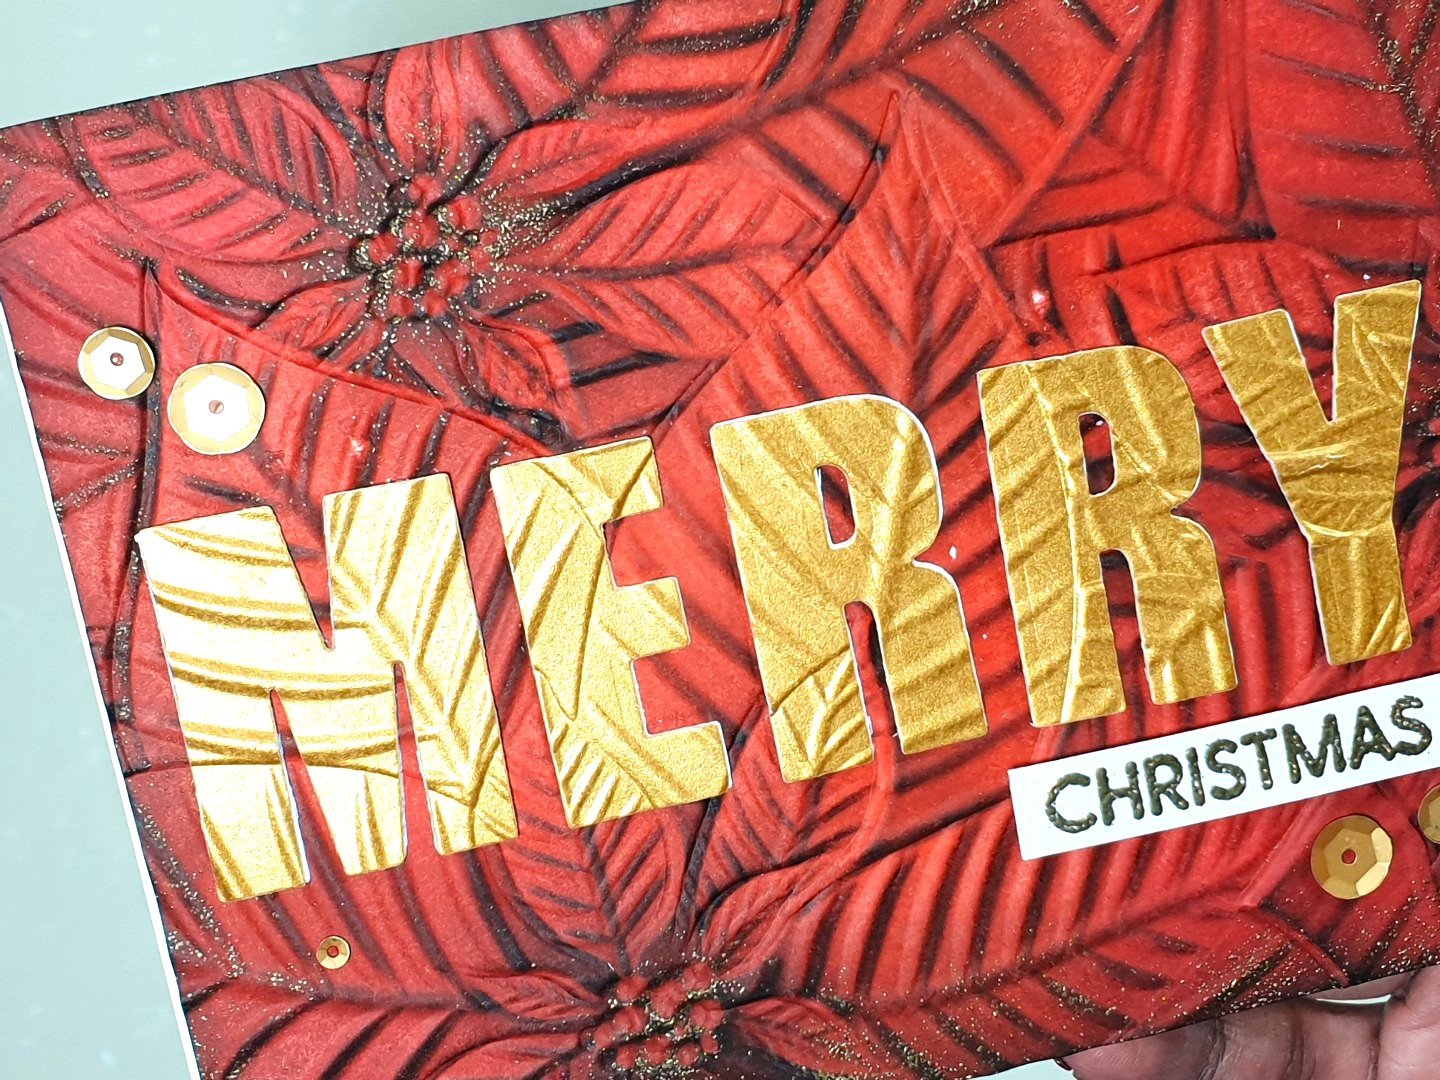
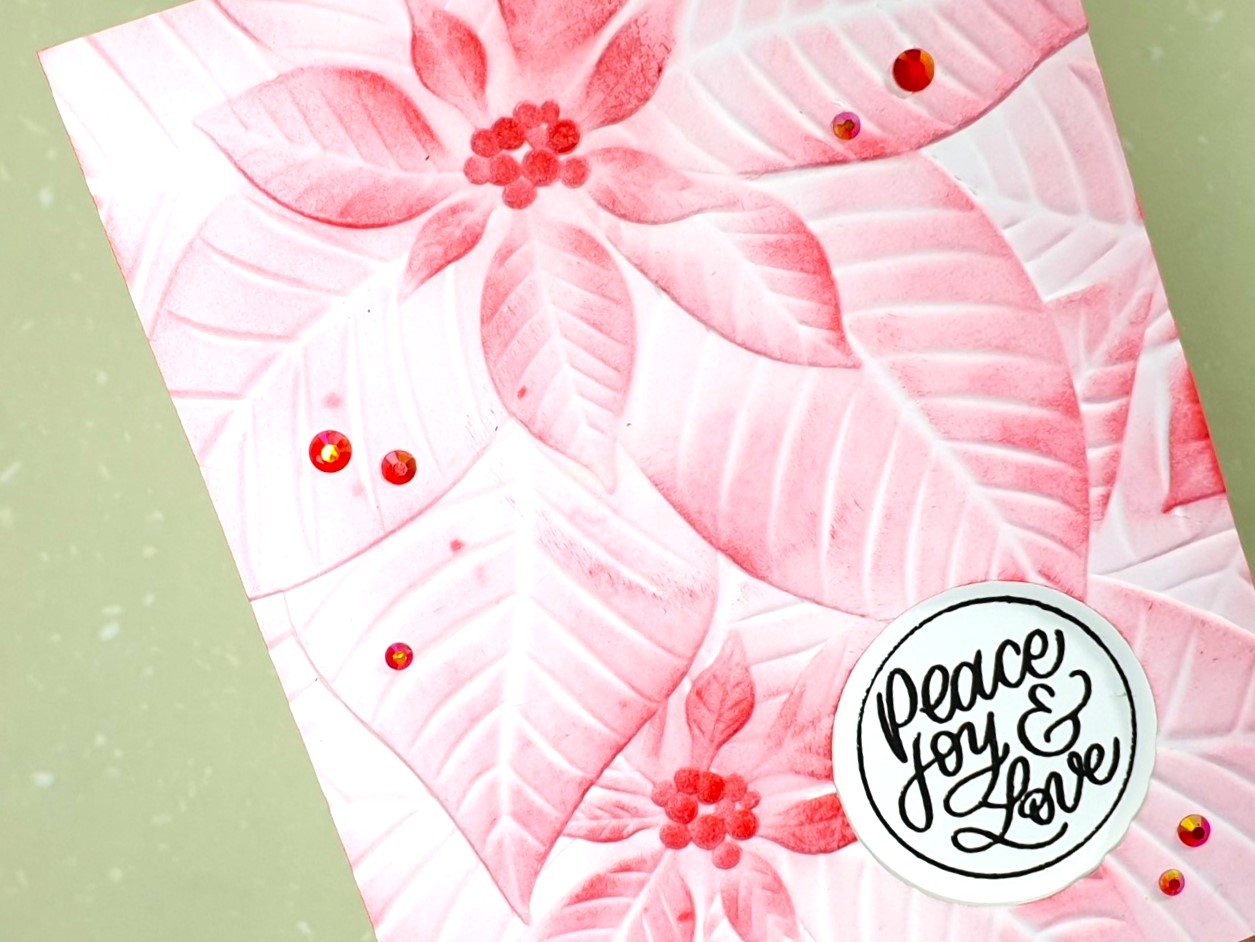
Card #5

Cut Neenah Solar White 80lb card to A2 size, adhere an inch and a half circle diameter die to lower right hand of the card panel, and run through die cutting machine. Spritz back of card panel with water to soften fibres so the card does not crack when embossed. Place card inside the Altenew Perfect Poinsettias 3D Embossing Folder, and run through embossing machine. Then apply Altenew Crisp Dye Ink Crimson and Velvet with a large blending brush and small blending brush. Apply inks lightly to ‘catch’ the raised areas.

Place embossed and inked card panel on top of A2 card base in a mini MISTI. Then place the circle ‘Peace Joy & Love’ stamp from Simon Says Stamp Christmas Word Mix 1 stamp in the die cut circle on the embossed panel. Pick up stamp with the ‘door’ of the stamping platform, remove the embossed panel, ink the stamp with Obsidian Pigment Ink, and stamp on card base. Sprinkle with clear embossing powder and melt embossing powder with heat tool.
Finish card by adhering Lucy’s Jewels Cherry Mix to card from with Crystal Katana gem picker tool and liquid glue with a fine tip.
Card #6

Take a Canson Watercolor paper and apply Altenew Crisp Dye Ink Orange Cream, Burnt Red, and Crimson randomly on the panel with a small blending brush. Spritz water on the back of watercolor paper and insert into Altenew Perfect Poinsettias 3D Embossing Folder, then run it through the embossing machine with an appropriate ‘sandwich’. Ensure that the inked panel is facing up on the side of the folder without the label on the embossing folder, so the inked side is debossed.
Then use a large blending brush and apply Mahogany Bark ink on the debossed panel so the darker ink accentuates the debossed image trapping the lighter ink on the watercolor panel.

Then use your fingers and lightly sprinkle gold embossing powder on the edges of the panel as well as the centres of the poinsettias. Note: If too much gold embossing powder is sprinkled, remove with a dry paint brush. Use a heat tool to melt the embossing powder.
The main and sub-sentiments are done the using the same technique as card #4. Finally attach Altenew Antique Gold Sequins with Crystal Katana gem picker tool and liquid glue with a fine tip.
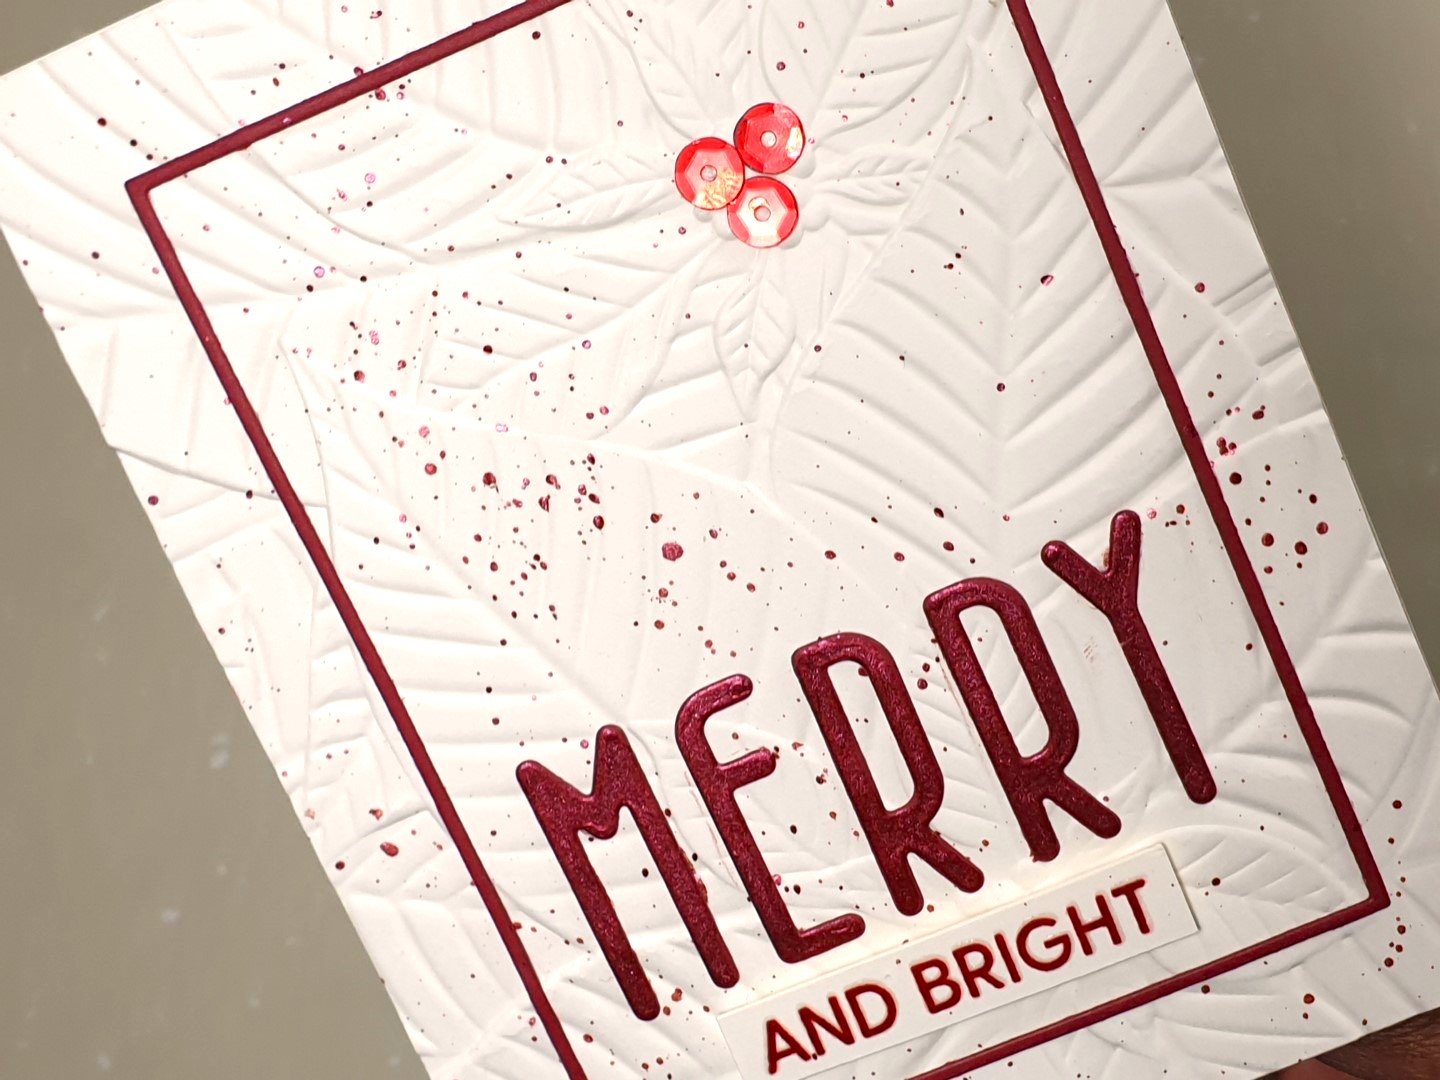
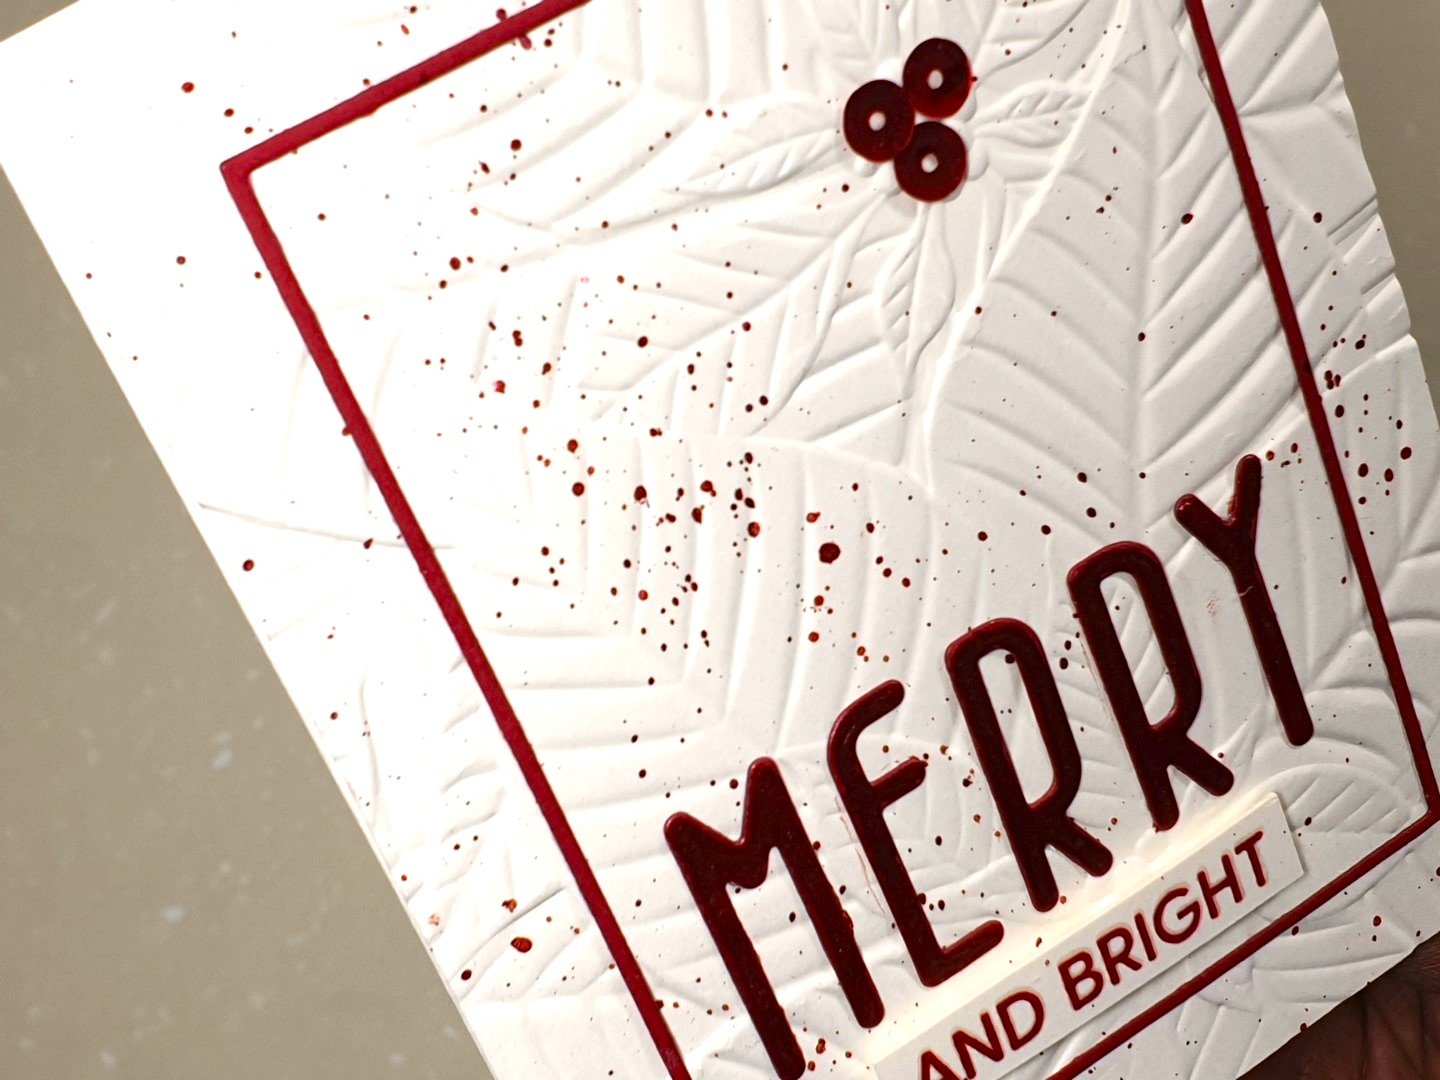
Card #7

Take an A2 card panel (Neenah Solar White 110lb), spritz back of card panel with water to soften fibres so the card does not crack when embossed. Place card inside the Altenew Perfect Poinsettias 3D Embossing Folder, and run through embossing machine.
Splatter embossed card panel with Altenew Metallic Watercolor set, Garnet. Die cut a red card with Simon Says Stamp A2 Thin Frames Die. It’s the thin frame that is on the card, but apply non-permanent glue on the rectangle that fits inside the frame and attach to middle of the embossed card panel. Use this rectangle as a guide to attach the thin frame to front of card panel with liquid glue.

Die cut the word ‘Merry’ with Altenew Tall Alpha Die Set And adhere to lower third of card panel within the thin frame. The sub-sentiment ‘and bright’ stamped with Velvet ink is from Waffle Flower Oversized Merry Stamp.
Back embossed panel with fun foam and attach to card front. Finally embellish card with Nuvo Ruby Red sequins with Crystal Katana gem picker tool and liquid glue with a fine tip.
Disclosure: Where available I use compensated affiliate links which means if you make a purchase, I receive a small commission at no extra cost to you. Thank you so much for your support!
