

Christmas Cards with a Gnome Tree - No white outline around die cut

Disclosure: Where available I use compensated affiliate links which means if you make a purchase, I receive a small commission at no extra cost to you. Thank you so much for your support!
This post which includes a video shows how I use the Spellbinders Gnome Tree die set to create three cards. I created these cards for the Christmas Craft Creations challenge which has a theme of Gnomes this month. This is my first submission as a Design Team member and I hope you like it and are inspired.
The technique I show here is how to not have a white line around your die cut when you have a non-white background. It takes a few steps but oh so worth it! I would love to hear your thoughts on this, please leave them in the comments below.
Check out the video below.
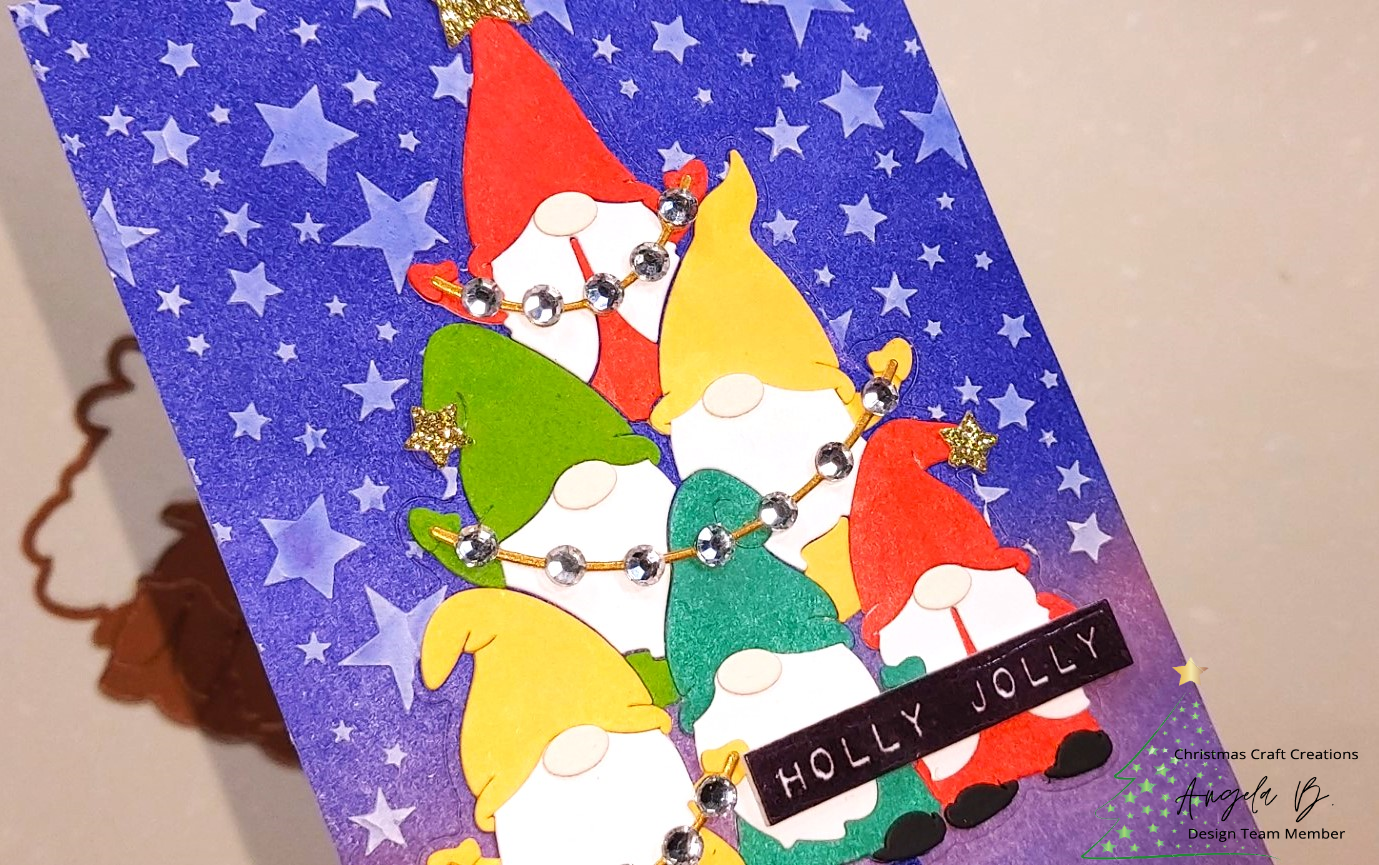
Card #1

The Spellbinders Gnome Tree die set is used to make this card. I did not have a gnome product, so got this specifically for this challenge, but I don’t think you’ve seen the last of it as I love it.
So how did I make this card without the white outline of the gnome tree. I dislike the white outline that you get when you cut out an image, unless of course your background is white. I also wanted the tiny bits of background colour to come through the small gaps in the gnome tree.
Here are the steps required for this card, also shown in the video, if you are a more visual person:
1. As I am going to be inking the individual pieces with ink and doing some ink blending of the background, I use Bristol Smooth Card. Use Catherine Pooler Date Night ink set, Drive-in, Serenade, and Do-Si-Do for the background with an ink blending brush. Allow a few minutes to dry and then attach a double-sided adhesive sheet to the back of the inked card panel.
2. Place the two gnome tree dies (the detail die and the outline die) on the inked card panel, tape down with low tack tape, so it does not move and run it through your die cutting machine. Do not use any shims as the aim is not to have the die cut through but more like leave an impression as a guide to stick the separate elements of the image. Remove the other side of the adhesive sheet and attach to the card base that you have chosen. I use a C6 card (which measures 10.5cm by 14.8cm), as that’s what I have easily available to me.
3. Place a star stencil on the inked and die cut card panel and apply Altenew Embossing Paste with a palette knife on the top two thirds on the card, avoiding the gnome tree as much as you can. Do this step only after the die cutting. Leave to air dry while you get on with the individual die cuts of the gnome tree.
4. Die cut only the detailed die of the gnome tree with Bristol Smooth Card. Use Catherine Pooler Life of the Party ink set, Tutti Frutti, Aquatini, Lime Rickey, and Tiara, to colour the inidividual die cuts that make up the gnome tree. As the pieces are quite small, place them on a masking paper or back of a post-it so it stays in place as you colour it using the ink pad direct to card method.

5. Use liquid glue with a fine tip and start gluing the pieces together and attaching to card base that has an impression of the die cut so you know where the pieces go. Also use the image on the packaging as a guide.
6. There are other elements such as the arms of the gnomes, shoes, and christmas lights, that will require to be die cut separately. I chose to use gems for the lights, which I attached with a gem picker tool, instead of die cutting tiny circles for this card. When cutting this tiny elements, I really appreciated having the Mini Blossom die cutting machine as it was quicker. For the nose I coloured it with Copic E0000 and Copic E01 to give it a subtle skin colour, and the shoes I die cut with black cardstock.
7. The sentiment, ‘Holly Jolly’ is from the Waffle Flower Labelmaker Holiday Sentiment Stamp and Die Combo, and the sentiment that also serves as the trunk of the gnome tree is from Simon Says Stamp Christmas Blessings stamp and die set.

8. For the stars at the top of the gnome tree and a couple at the tipe of the gnomes’ hats, I die cut with Altenew Gilded Flitter Cardstock, Citrine.
If you are into paper piecing you will love this project. I find it so staisfying to see the results.
This card is for my younger son. I make loads of Christmas cards, but for my immediate family of two sons and my husband, it’s always the last cards that I make. The next two cards will be for my older son and my husband.
Card #2


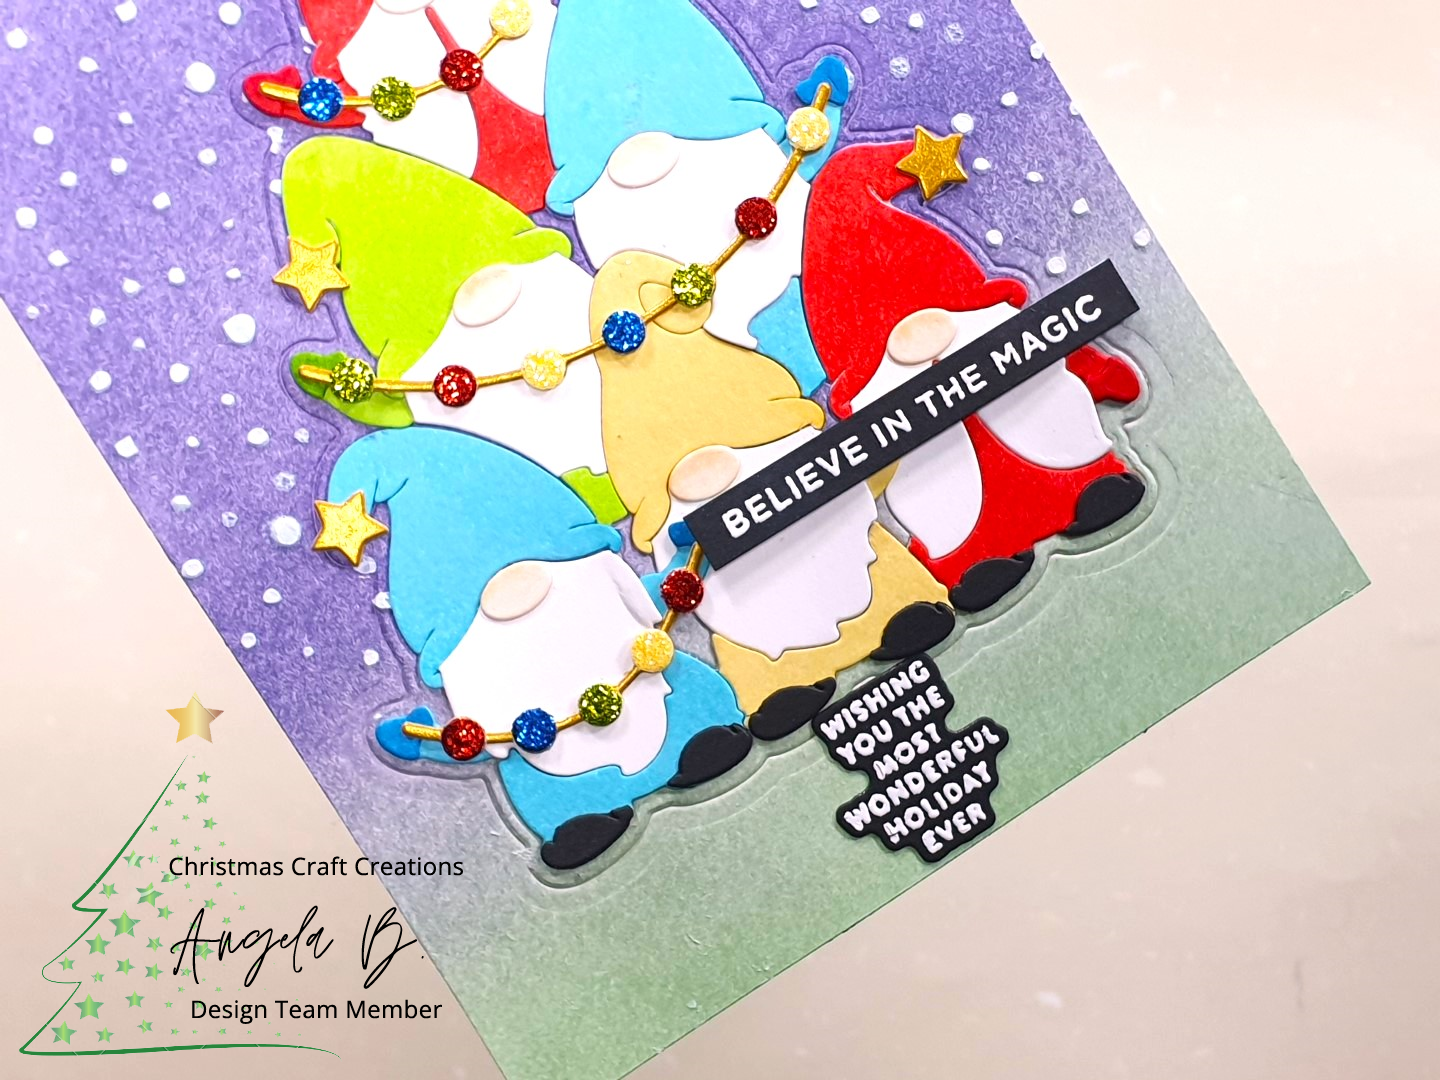
The steps for Card #2 is the same as Card #1, but here are the different products used for this card.
Background - Catherine Pooler Apothecary ink set, Crushed Violet and Wintergreen.
Gnomes (hat and clothes) - Catherine Pooler Spring Fling ink set, Garden Party, Oh Boy!; and Catherine Pooler Carnivale ink set, Samba; and finally Catherine Pooler Apothecary ink set, Whipped Honey.
Gnomes (gloves) - Copics Y38, R29, B06, YG17
Lights - Memory Box Twinkling Jewel Glitter Pack
Sentiment - Spellbinders Mini Christmas Greetings stamp set
Card #3


The steps for Card #3 is very much like that for Cards #2 and #3, but used patterned paper for paper piecing. Utilised the monochromatic paper packs from Catherine Pooler and I love how the card turned out.
Background - Catherine Pooler Aquatini Prints.
Gnomes (hat and clothes) - Catherine Pooler Rockin’ Red Prints, Catherine Pooler Serenade Prints, Catherine Pooler Lime Rickey Prints, Catherine Pooler Something Borrowed Prints
Lights - Memory Box Twinkling Jewel Glitter Pack
Stars - Concord & 9th Neutrals Glitter Paper Pack
Heart - Concord & 9th Neutrals Glitter Paper Pack die cut with Simon Says Stamp Clipping Heart Die
Sentiment - Spellbinders Mini Christmas Greetings stamp set
Disclosure: Where available I use compensated affiliate links which means if you make a purchase, I receive a small commission at no extra cost to you. Thank you so much for your support!

I hope you will join us for this fun challenge theme this month! Happy Holidays to you and yours!